生成 SDK
因为 FastAPI 基于 OpenAPI 规范,它的 API 可以用许多工具都能理解的标准格式来描述。
这让你可以轻松生成最新的文档、多语言的客户端库(SDKs),以及与代码保持同步的测试或自动化工作流。
本指南将带你为 FastAPI 后端生成一个 TypeScript SDK。
开源 SDK 生成器
一个功能多样的选择是 OpenAPI Generator,它支持多种编程语言,可以根据你的 OpenAPI 规范生成 SDK。
对于 TypeScript 客户端,Hey API 是为 TypeScript 生态打造的专用方案,提供优化的使用体验。
你还可以在 OpenAPI.Tools 上发现更多 SDK 生成器。
提示
FastAPI 会自动生成 OpenAPI 3.1 规范,因此你使用的任何工具都必须支持该版本。
来自 FastAPI 赞助商的 SDK 生成器
本节介绍的是由赞助 FastAPI 的公司提供的、具备风险投资背景或公司支持的方案。这些产品在高质量生成的 SDK 之上,提供了更多特性和集成。
通过 ✨ 赞助 FastAPI ✨,这些公司帮助确保框架及其生态保持健康并且可持续。
他们的赞助也体现了对 FastAPI 社区(也就是你)的高度承诺,不仅关注提供优秀的服务,也支持一个健壮且繁荣的框架——FastAPI。🙇
例如,你可以尝试:
其中一些方案也可能是开源的或提供免费层级,你可以不花钱就先试用。其他商业 SDK 生成器也可在网上找到。🤓
创建一个 TypeScript SDK
先从一个简单的 FastAPI 应用开始:
from fastapi import FastAPI
from pydantic import BaseModel

app = FastAPI()


class Item(BaseModel):
    name: str
    price: float


class ResponseMessage(BaseModel):
    message: str


@app.post("/items/", response_model=ResponseMessage)
async def create_item(item: Item):
    return {"message": "item received"}


@app.get("/items/", response_model=list[Item])
async def get_items():
    return [
        {"name": "Plumbus", "price": 3},
        {"name": "Portal Gun", "price": 9001},
    ]
请注意,这些路径操作使用 Item 和 ResponseMessage 模型来定义它们的请求载荷和响应载荷。
API 文档
访问 /docs 时,你会看到有用于请求发送和响应接收数据的模式:

之所以能看到这些模式,是因为它们在应用中用模型声明了。
这些信息会包含在应用的 OpenAPI 模式 中,并显示在 API 文档里。
OpenAPI 中包含的这些模型信息就是用于生成客户端代码的基础。
Hey API
当我们有了带模型的 FastAPI 应用后,可以使用 Hey API 来生成 TypeScript 客户端。最快的方式是通过 npx:
npx @hey-api/openapi-ts -i http://localhost:8000/openapi.json -o src/client
这会在 ./src/client 生成一个 TypeScript SDK。
你可以在其官网了解如何安装 @hey-api/openapi-ts,以及阅读生成结果的说明。
使用 SDK
现在你可以导入并使用客户端代码了。它可能是这样,并且你会发现方法有自动补全:
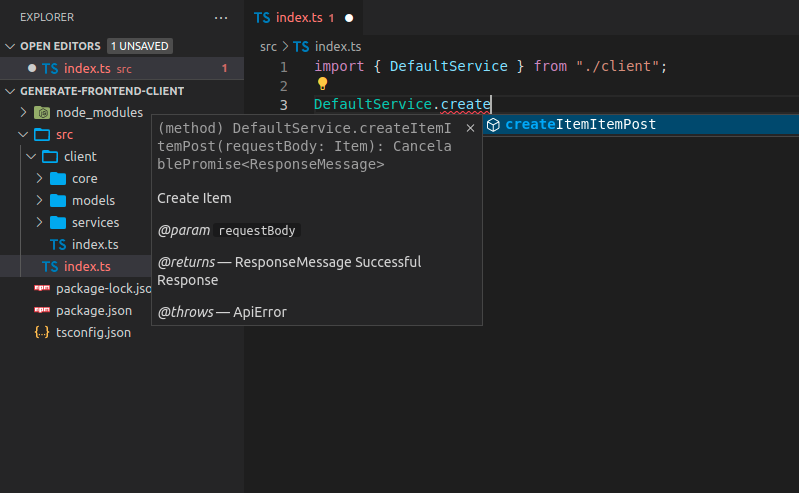
要发送的载荷也会有自动补全:

提示
请注意 name 和 price 的自动补全,它们是在 FastAPI 应用中的 Item 模型里定义的。
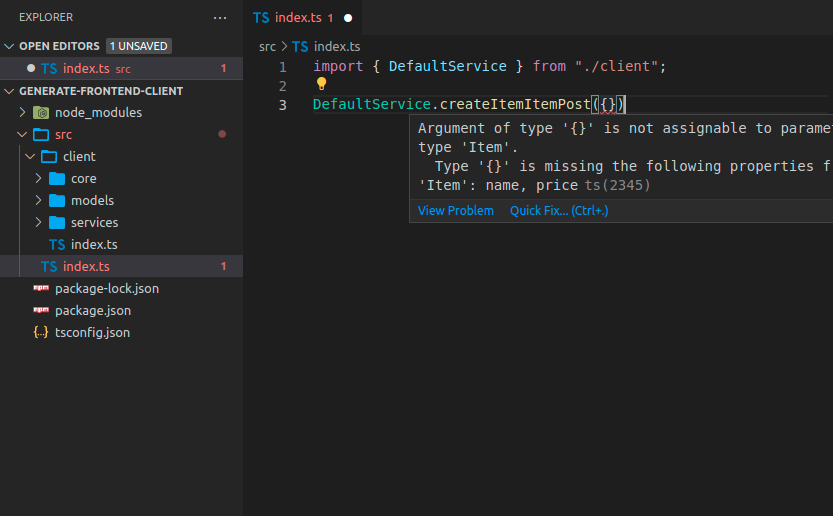
你发送的数据如果不符合要求,会在编辑器中显示内联错误:
响应对象同样有自动补全:

带有标签的 FastAPI 应用
很多情况下,你的 FastAPI 应用会更大,你可能会用标签来划分不同组的路径操作。
例如,你可以有一个 items 相关的部分和另一个 users 相关的部分,它们可以用标签来分隔:
from fastapi import FastAPI
from pydantic import BaseModel

app = FastAPI()


class Item(BaseModel):
    name: str
    price: float


class ResponseMessage(BaseModel):
    message: str


class User(BaseModel):
    username: str
    email: str


@app.post("/items/", response_model=ResponseMessage, tags=["items"])
async def create_item(item: Item):
    return {"message": "Item received"}


@app.get("/items/", response_model=list[Item], tags=["items"])
async def get_items():
    return [
        {"name": "Plumbus", "price": 3},
        {"name": "Portal Gun", "price": 9001},
    ]


@app.post("/users/", response_model=ResponseMessage, tags=["users"])
async def create_user(user: User):
    return {"message": "User received"}
生成带标签的 TypeScript 客户端
如果你为使用了标签的 FastAPI 应用生成客户端,通常也会根据标签来拆分客户端代码。
这样你就可以在客户端代码中把内容正确地组织和分组:
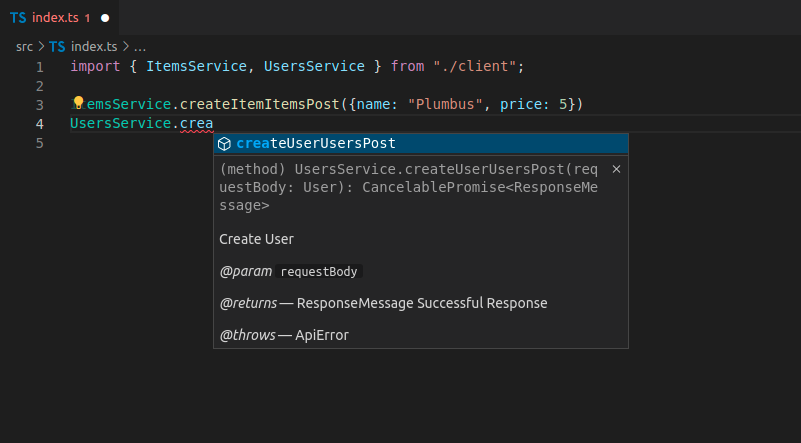
在这个例子中,你会有:
ItemsServiceUsersService
客户端方法名
现在,像 createItemItemsPost 这样的生成方法名看起来不太简洁:
ItemsService.createItemItemsPost({name: "Plumbus", price: 5})
...这是因为客户端生成器会把每个路径操作的 OpenAPI 内部操作 ID(operation ID)用作方法名的一部分。
OpenAPI 要求每个操作 ID 在所有路径操作中都是唯一的,因此 FastAPI 会使用函数名、路径和HTTP 方法/操作来生成操作 ID,以确保其唯一性。
接下来我会告诉你如何改进。🤓
自定义操作 ID 与更好的方法名
你可以修改这些操作 ID 的生成方式,使之更简单,从而在客户端中得到更简洁的方法名。
在这种情况下,你需要用其他方式确保每个操作 ID 依然是唯一的。
例如,你可以确保每个路径操作都有一个标签,然后基于标签和路径操作名称(函数名)来生成操作 ID。
自定义唯一 ID 生成函数
FastAPI 为每个路径操作使用一个唯一 ID,它既用于操作 ID,也用于请求或响应里任何需要的自定义模型名称。
你可以自定义这个函数。它接收一个 APIRoute 并返回一个字符串。
例如,这里使用第一个标签(你很可能只有一个标签)和路径操作名称(函数名)。
然后你可以把这个自定义函数通过 generate_unique_id_function 参数传给 FastAPI:
from fastapi import FastAPI
from fastapi.routing import APIRoute
from pydantic import BaseModel


def custom_generate_unique_id(route: APIRoute):
    return f"{route.tags[0]}-{route.name}"


app = FastAPI(generate_unique_id_function=custom_generate_unique_id)


class Item(BaseModel):
    name: str
    price: float


class ResponseMessage(BaseModel):
    message: str


class User(BaseModel):
    username: str
    email: str


@app.post("/items/", response_model=ResponseMessage, tags=["items"])
async def create_item(item: Item):
    return {"message": "Item received"}


@app.get("/items/", response_model=list[Item], tags=["items"])
async def get_items():
    return [
        {"name": "Plumbus", "price": 3},
        {"name": "Portal Gun", "price": 9001},
    ]


@app.post("/users/", response_model=ResponseMessage, tags=["users"])
async def create_user(user: User):
    return {"message": "User received"}
使用自定义操作 ID 生成 TypeScript 客户端
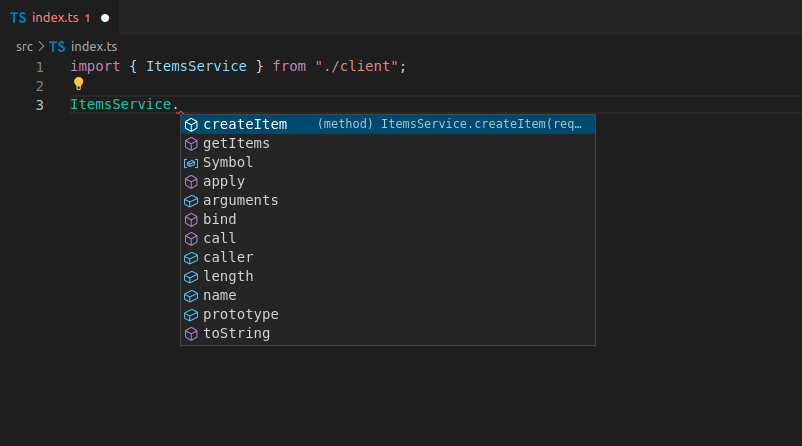
现在再次生成客户端,你会看到方法名已经改进:

如你所见,方法名现在由标签和函数名组成,不再包含 URL 路径和 HTTP 操作的信息。
为客户端生成器预处理 OpenAPI 规范
生成的代码中仍有一些重复信息。
我们已经知道这个方法与 items 有关,因为它位于 ItemsService(来自标签),但方法名里仍然带有标签名前缀。😕
通常我们仍然希望在 OpenAPI 中保留它,以确保操作 ID 的唯一性。
但对于生成的客户端,我们可以在生成之前修改 OpenAPI 的操作 ID,只是为了让方法名更美观、更简洁。
我们可以把 OpenAPI JSON 下载到 openapi.json 文件中,然后用如下脚本移除这个标签前缀:
import json
from pathlib import Path

file_path = Path("./openapi.json")
openapi_content = json.loads(file_path.read_text())

for path_data in openapi_content["paths"].values():
    for operation in path_data.values():
        tag = operation["tags"][0]
        operation_id = operation["operationId"]
        to_remove = f"{tag}-"
        new_operation_id = operation_id[len(to_remove) :]
        operation["operationId"] = new_operation_id

file_path.write_text(json.dumps(openapi_content))
import * as fs from 'fs'

async function modifyOpenAPIFile(filePath) {
  try {
    const data = await fs.promises.readFile(filePath)
    const openapiContent = JSON.parse(data)

    const paths = openapiContent.paths
    for (const pathKey of Object.keys(paths)) {
      const pathData = paths[pathKey]
      for (const method of Object.keys(pathData)) {
        const operation = pathData[method]
        if (operation.tags && operation.tags.length > 0) {
          const tag = operation.tags[0]
          const operationId = operation.operationId
          const toRemove = `${tag}-`
          if (operationId.startsWith(toRemove)) {
            const newOperationId = operationId.substring(toRemove.length)
            operation.operationId = newOperationId
          }
        }
      }
    }

    await fs.promises.writeFile(
      filePath,
      JSON.stringify(openapiContent, null, 2),
    )
    console.log('File successfully modified')
  } catch (err) {
    console.error('Error:', err)
  }
}

const filePath = './openapi.json'
modifyOpenAPIFile(filePath)
这样,操作 ID 会从 items-get_items 之类的名字重命名为 get_items,从而让客户端生成器生成更简洁的方法名。
使用预处理后的 OpenAPI 生成 TypeScript 客户端
因为最终结果现在保存在 openapi.json 中,你需要更新输入位置:
npx @hey-api/openapi-ts -i ./openapi.json -o src/client
生成新客户端后,你将拥有简洁的方法名,并具备自动补全、内联错误等功能:
优点
使用自动生成的客户端时,你会获得以下内容的自动补全:
- 方法
- 请求体中的数据、查询参数等
- 响应数据
你还会为所有内容获得内联错误。
每当你更新后端代码并重新生成前端时,新的路径操作会作为方法可用,旧的方法会被移除,其他任何更改都会反映到生成的代码中。🤓
这也意味着如果有任何变更,它会自动反映到客户端代码中。而当你构建客户端时,如果所用数据存在任何不匹配,它会直接报错。
因此,你可以在开发周期的早期就发现许多错误,而不必等到错误在生产环境中暴露给最终用户后再去调试问题所在。✨